CRM Web Lead API
v1.0The CubixOne CRM Web Lead API lets you capture leads directly from any external website, landing page, or application — straight into your CRM pipeline — without requiring any authentication from the end user.
How it works
When a visitor submits a form on your website, your frontend sends a POST request to CubixOne with the lead's data. CubixOne validates the submission, creates a lead in the configured pipeline, and returns a simple {"ok": true} response. The lead appears immediately in the CRM.
Use cases
| Scenario | What happens |
|---|---|
| Contact form on your website | Visitor fills the form → lead created in pipeline automatically |
| Landing page campaign | One form per campaign, each pointing to a different pipeline stage |
| Partner referral portal | External partner submits leads via API integration |
| Mobile app onboarding | App sends lead data on user sign-up |
| Third-party integrations | Zapier, Make, n8n posting to CubixOne |
Base endpoint
Replace {token} with the UUID token shown in your webform settings. The token is unique per form and per company — it cannot be reused across tenants.
Quick response reference
| HTTP Status | Meaning |
|---|---|
| 200 OK | Lead created successfully — {"ok": true} |
| 400 Bad Request | Invalid JSON body |
| 403 Forbidden | Request origin not in the allowed domains list |
| 404 Not Found | Token not found or form is disabled |
| 405 Method Not Allowed | Only POST is accepted |
| 429 Too Many Requests | Rate limit exceeded (10 req / 60s per IP) |
| 500 Internal Server Error | No pipeline or stage configured for this form |
Configuration
Everything is configured inside CubixOne — no code required. Follow the steps below to have your first webform live in under 5 minutes.
Step-by-step setup
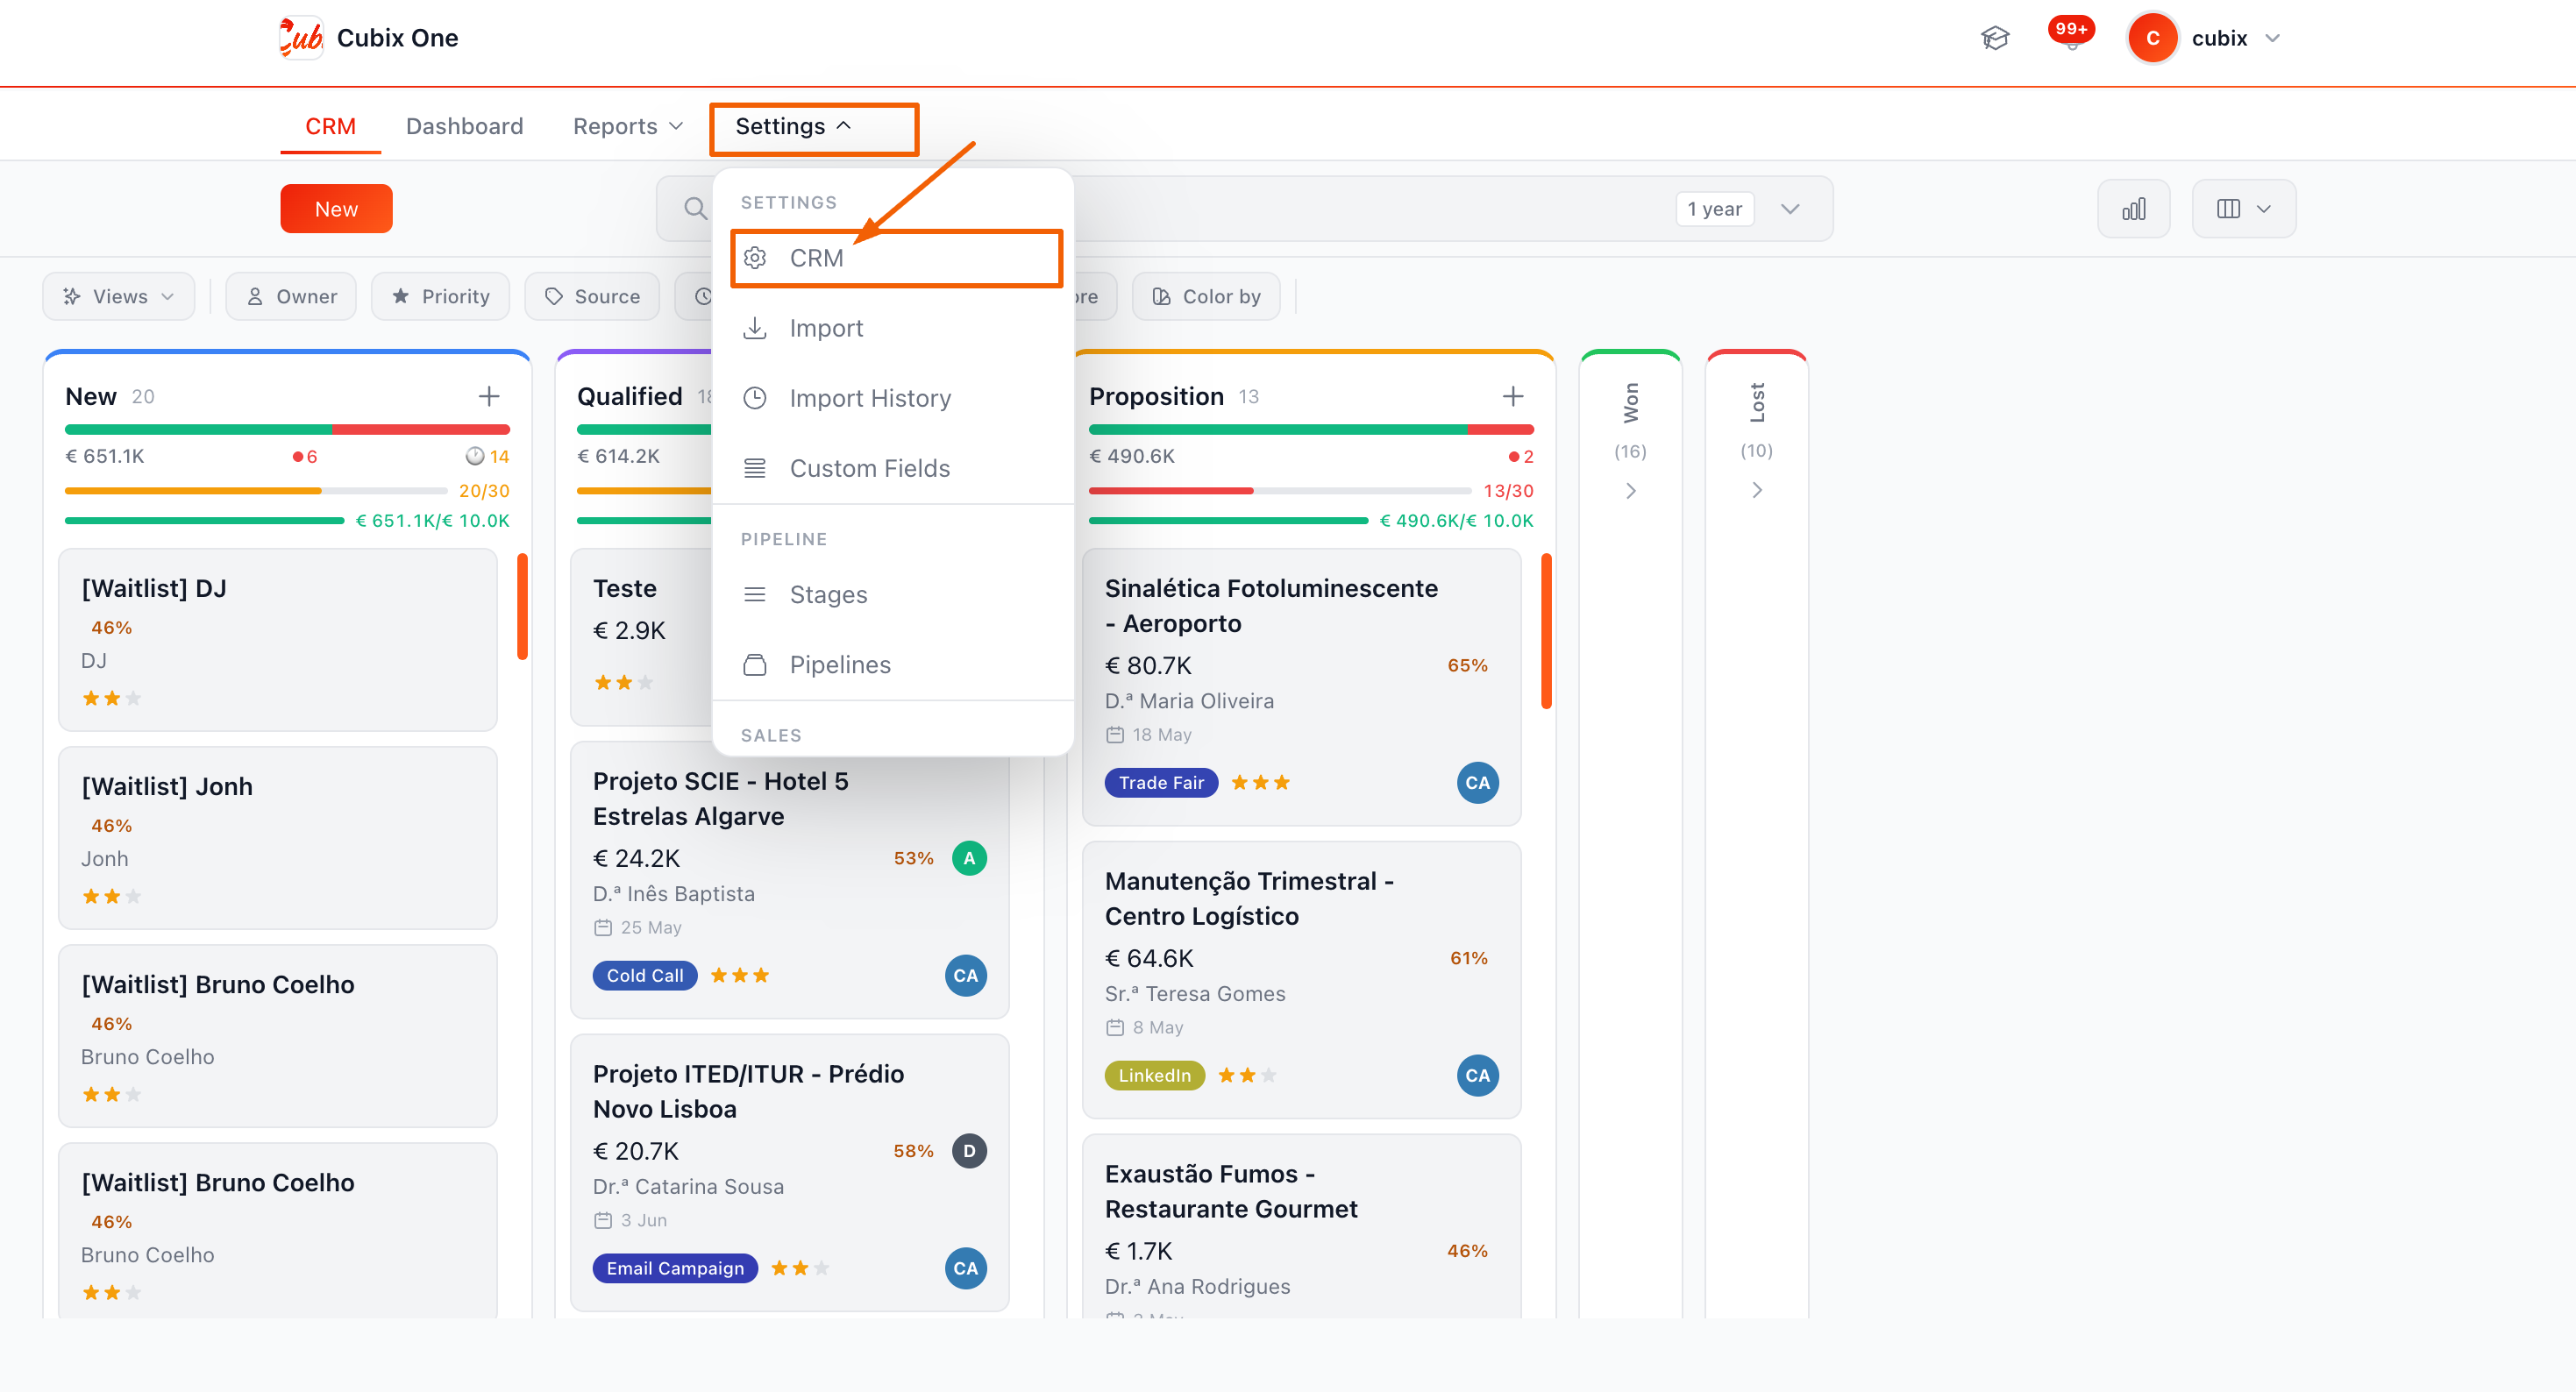
Open CRM Settings
In the CubixOne dashboard, navigate to CRM → Settings from the left sidebar. You need the manager or admin role to access settings.
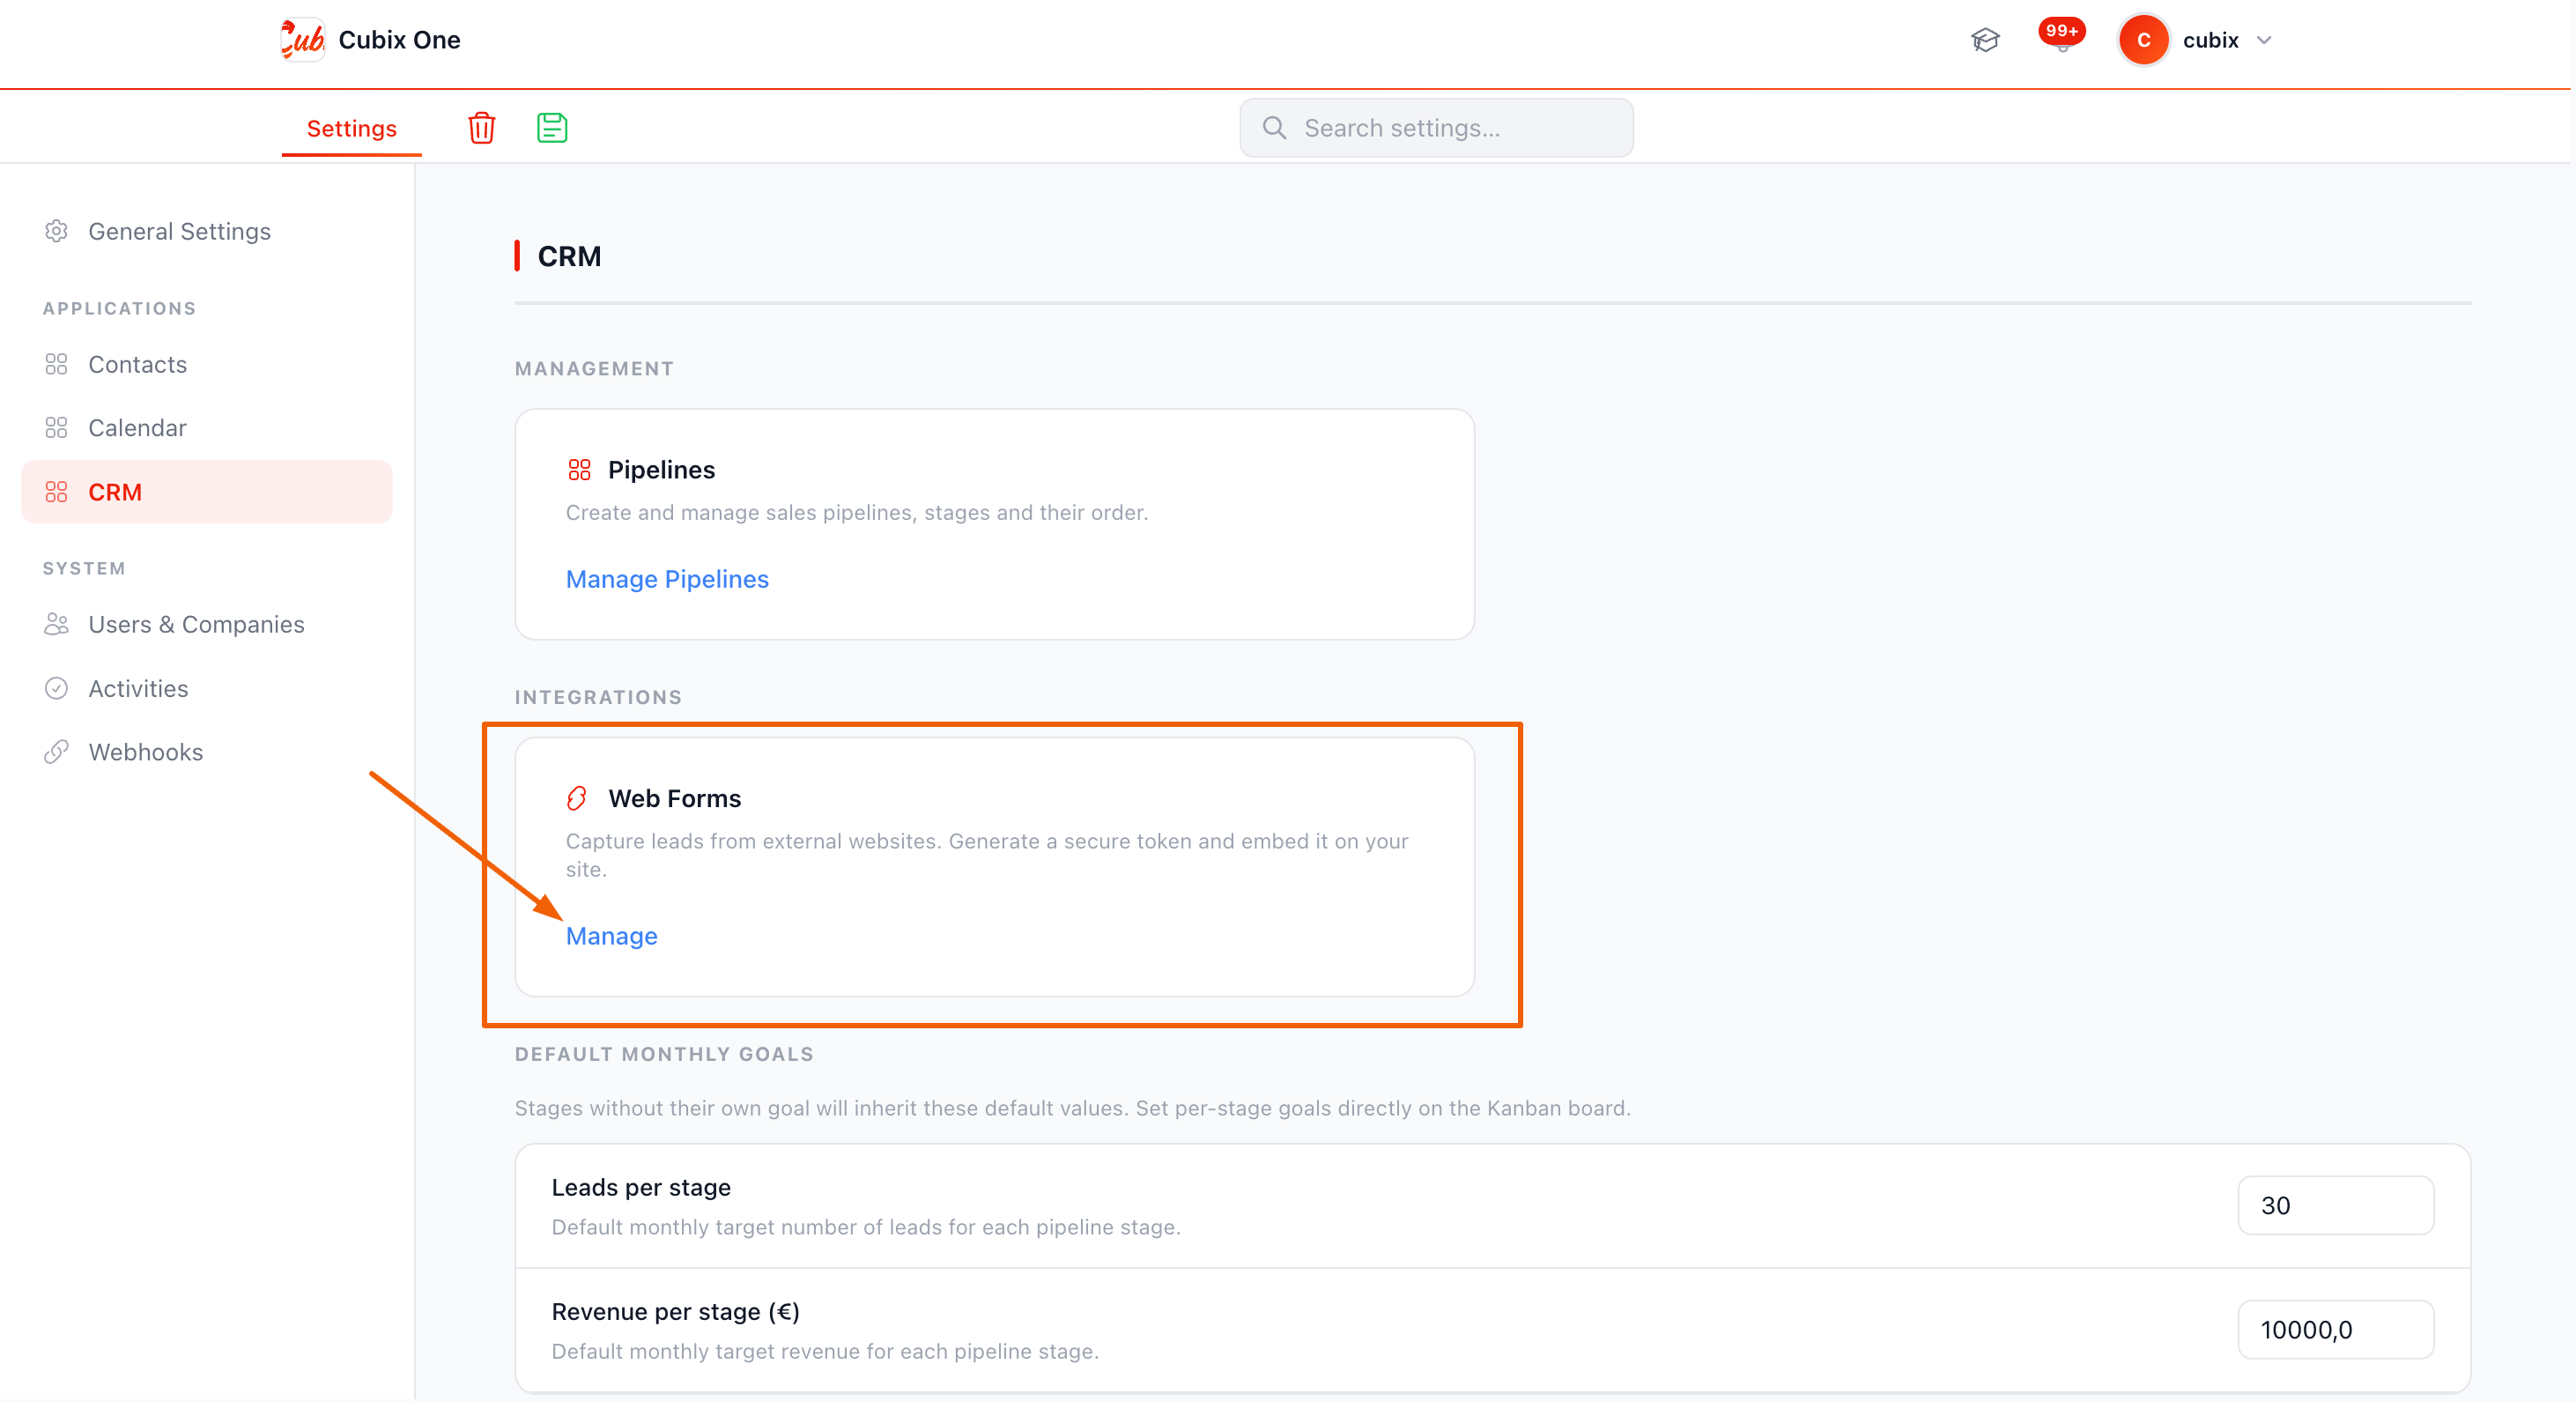
Go to the Webforms tab
Inside CRM Settings, click the Webforms tab. You will see a list of all existing webforms for the current company, along with their status (active/inactive), submission count, and last submission date.
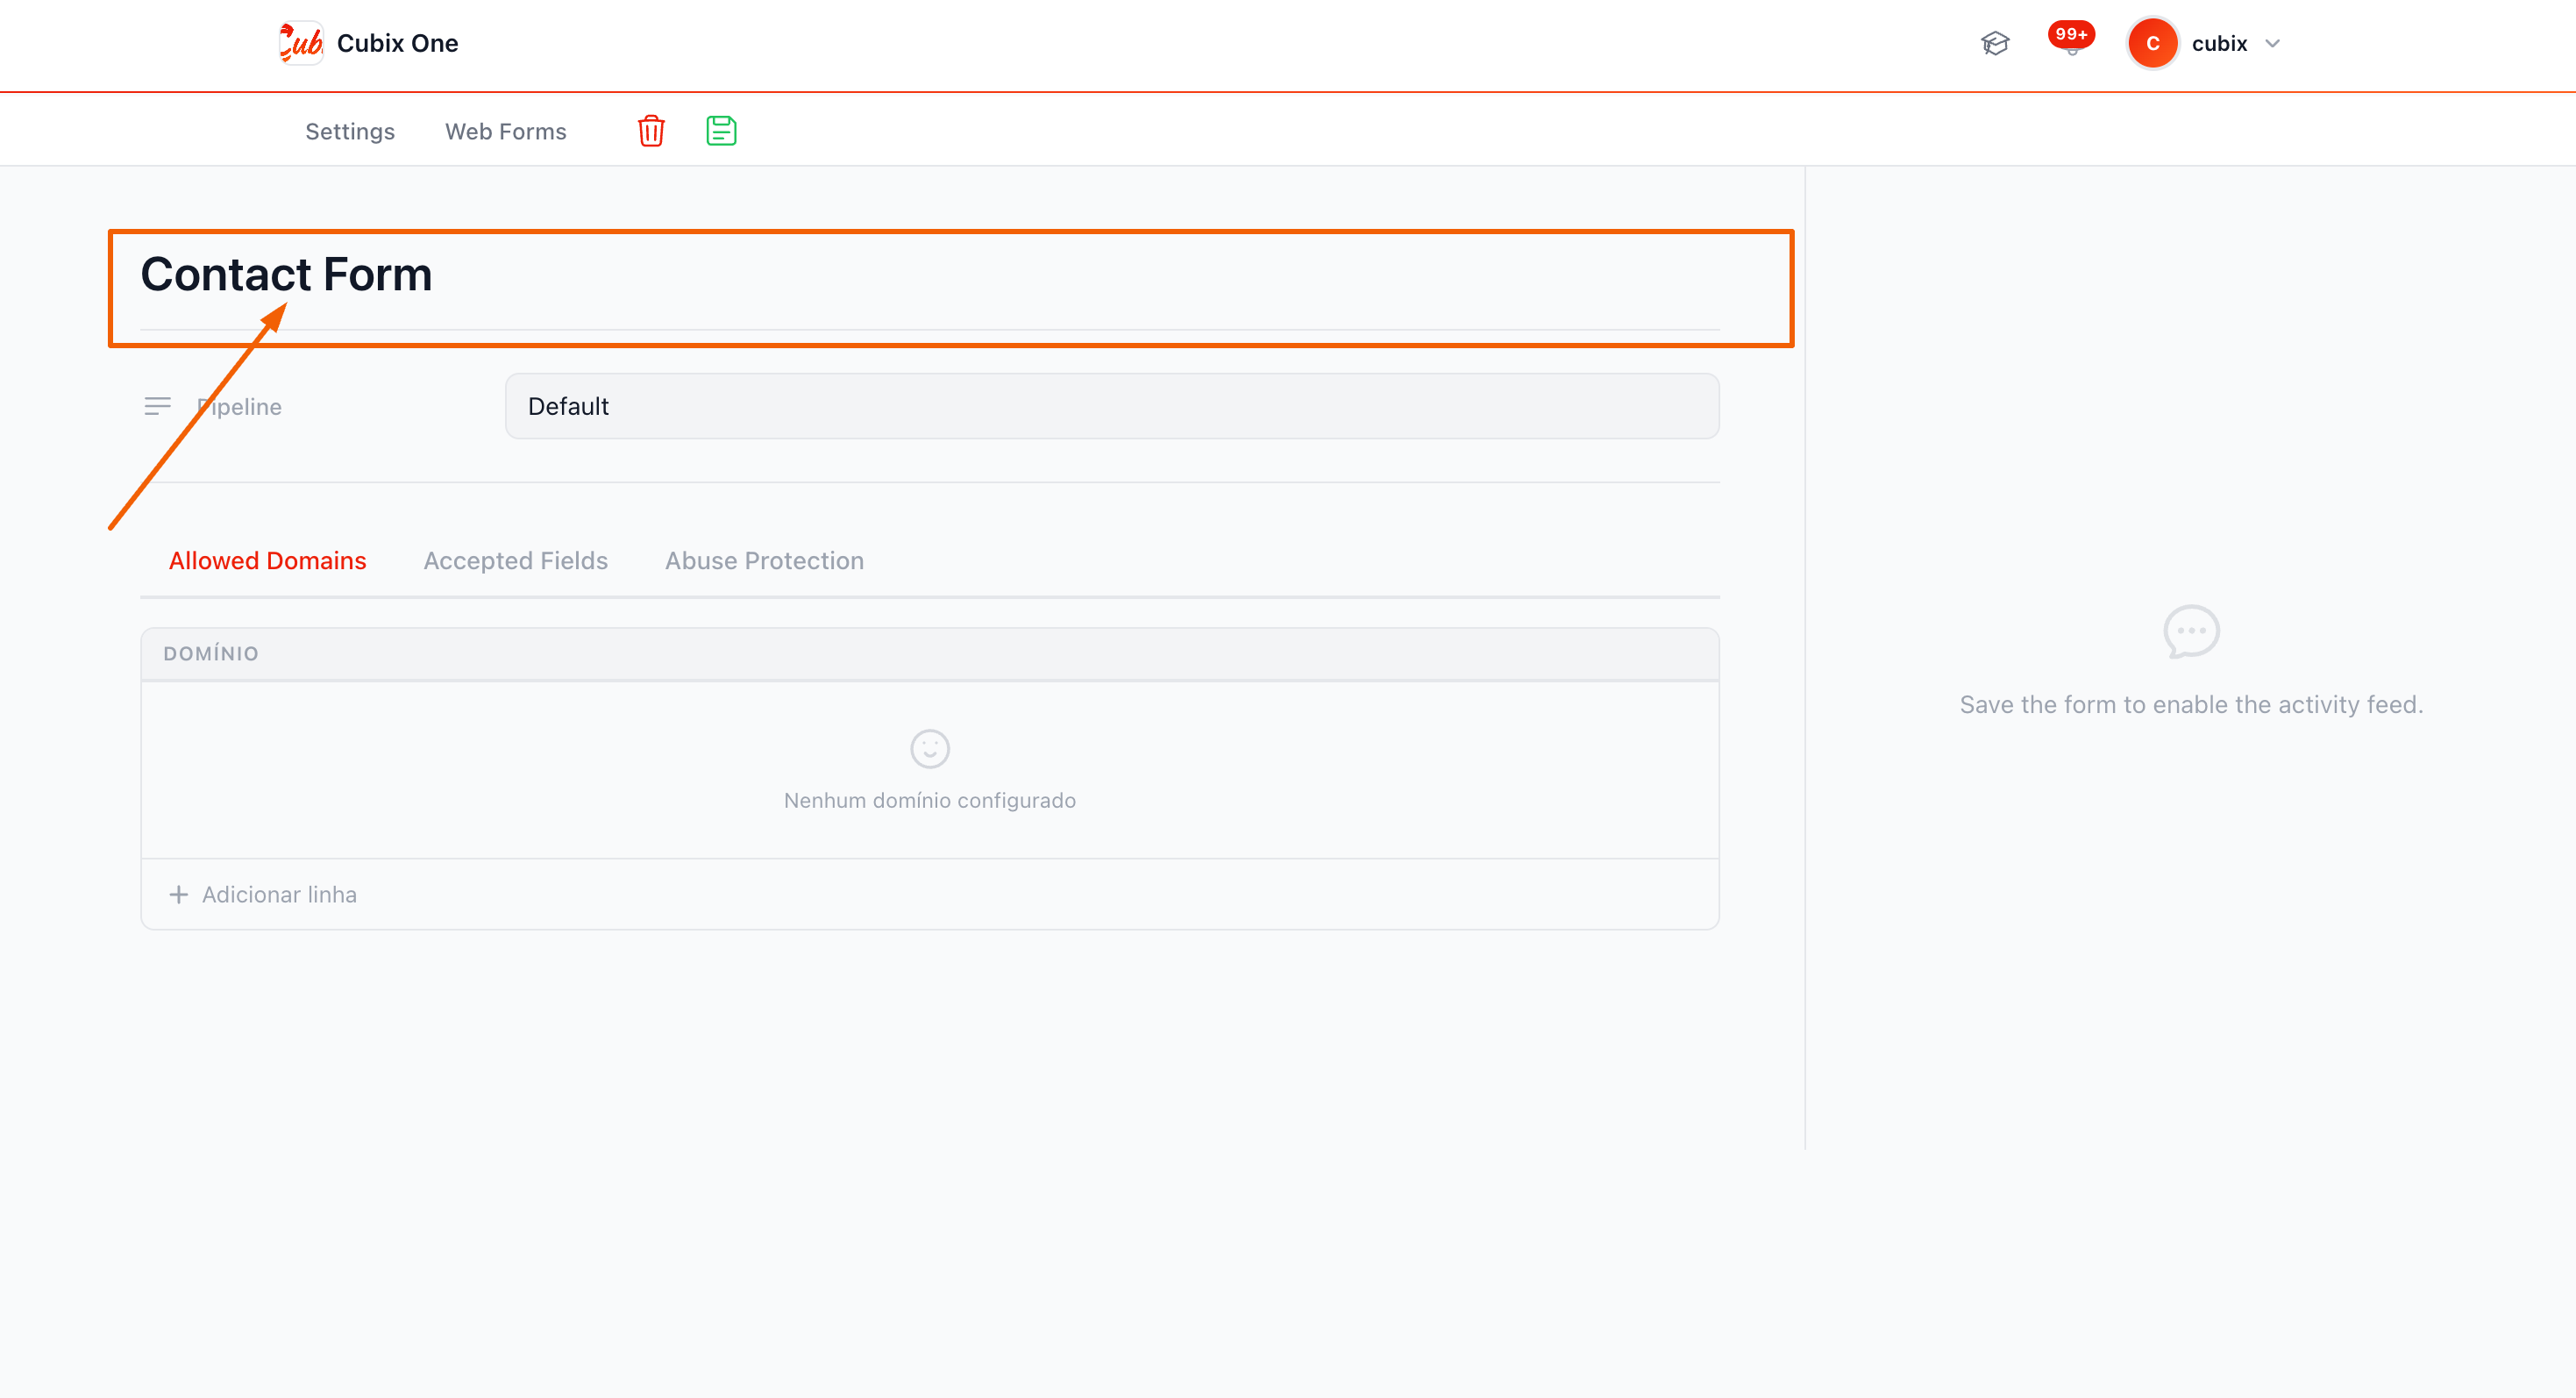
Create a new Webform
Click + New Webform. Fill in:
| Field | Description | Required |
|---|---|---|
| Name | Internal label (e.g. "Website Contact Form") | Yes |
| Pipeline | Which pipeline the leads will be created in | Optional |
| Allowed Domains | Domains allowed to send submissions (CORS protection) | Optional |
| Accepted Fields | Which fields this form will accept (built-in + custom) | Optional |
| Abuse Mode | What to do on spike detection: alert only, or also block | Optional |
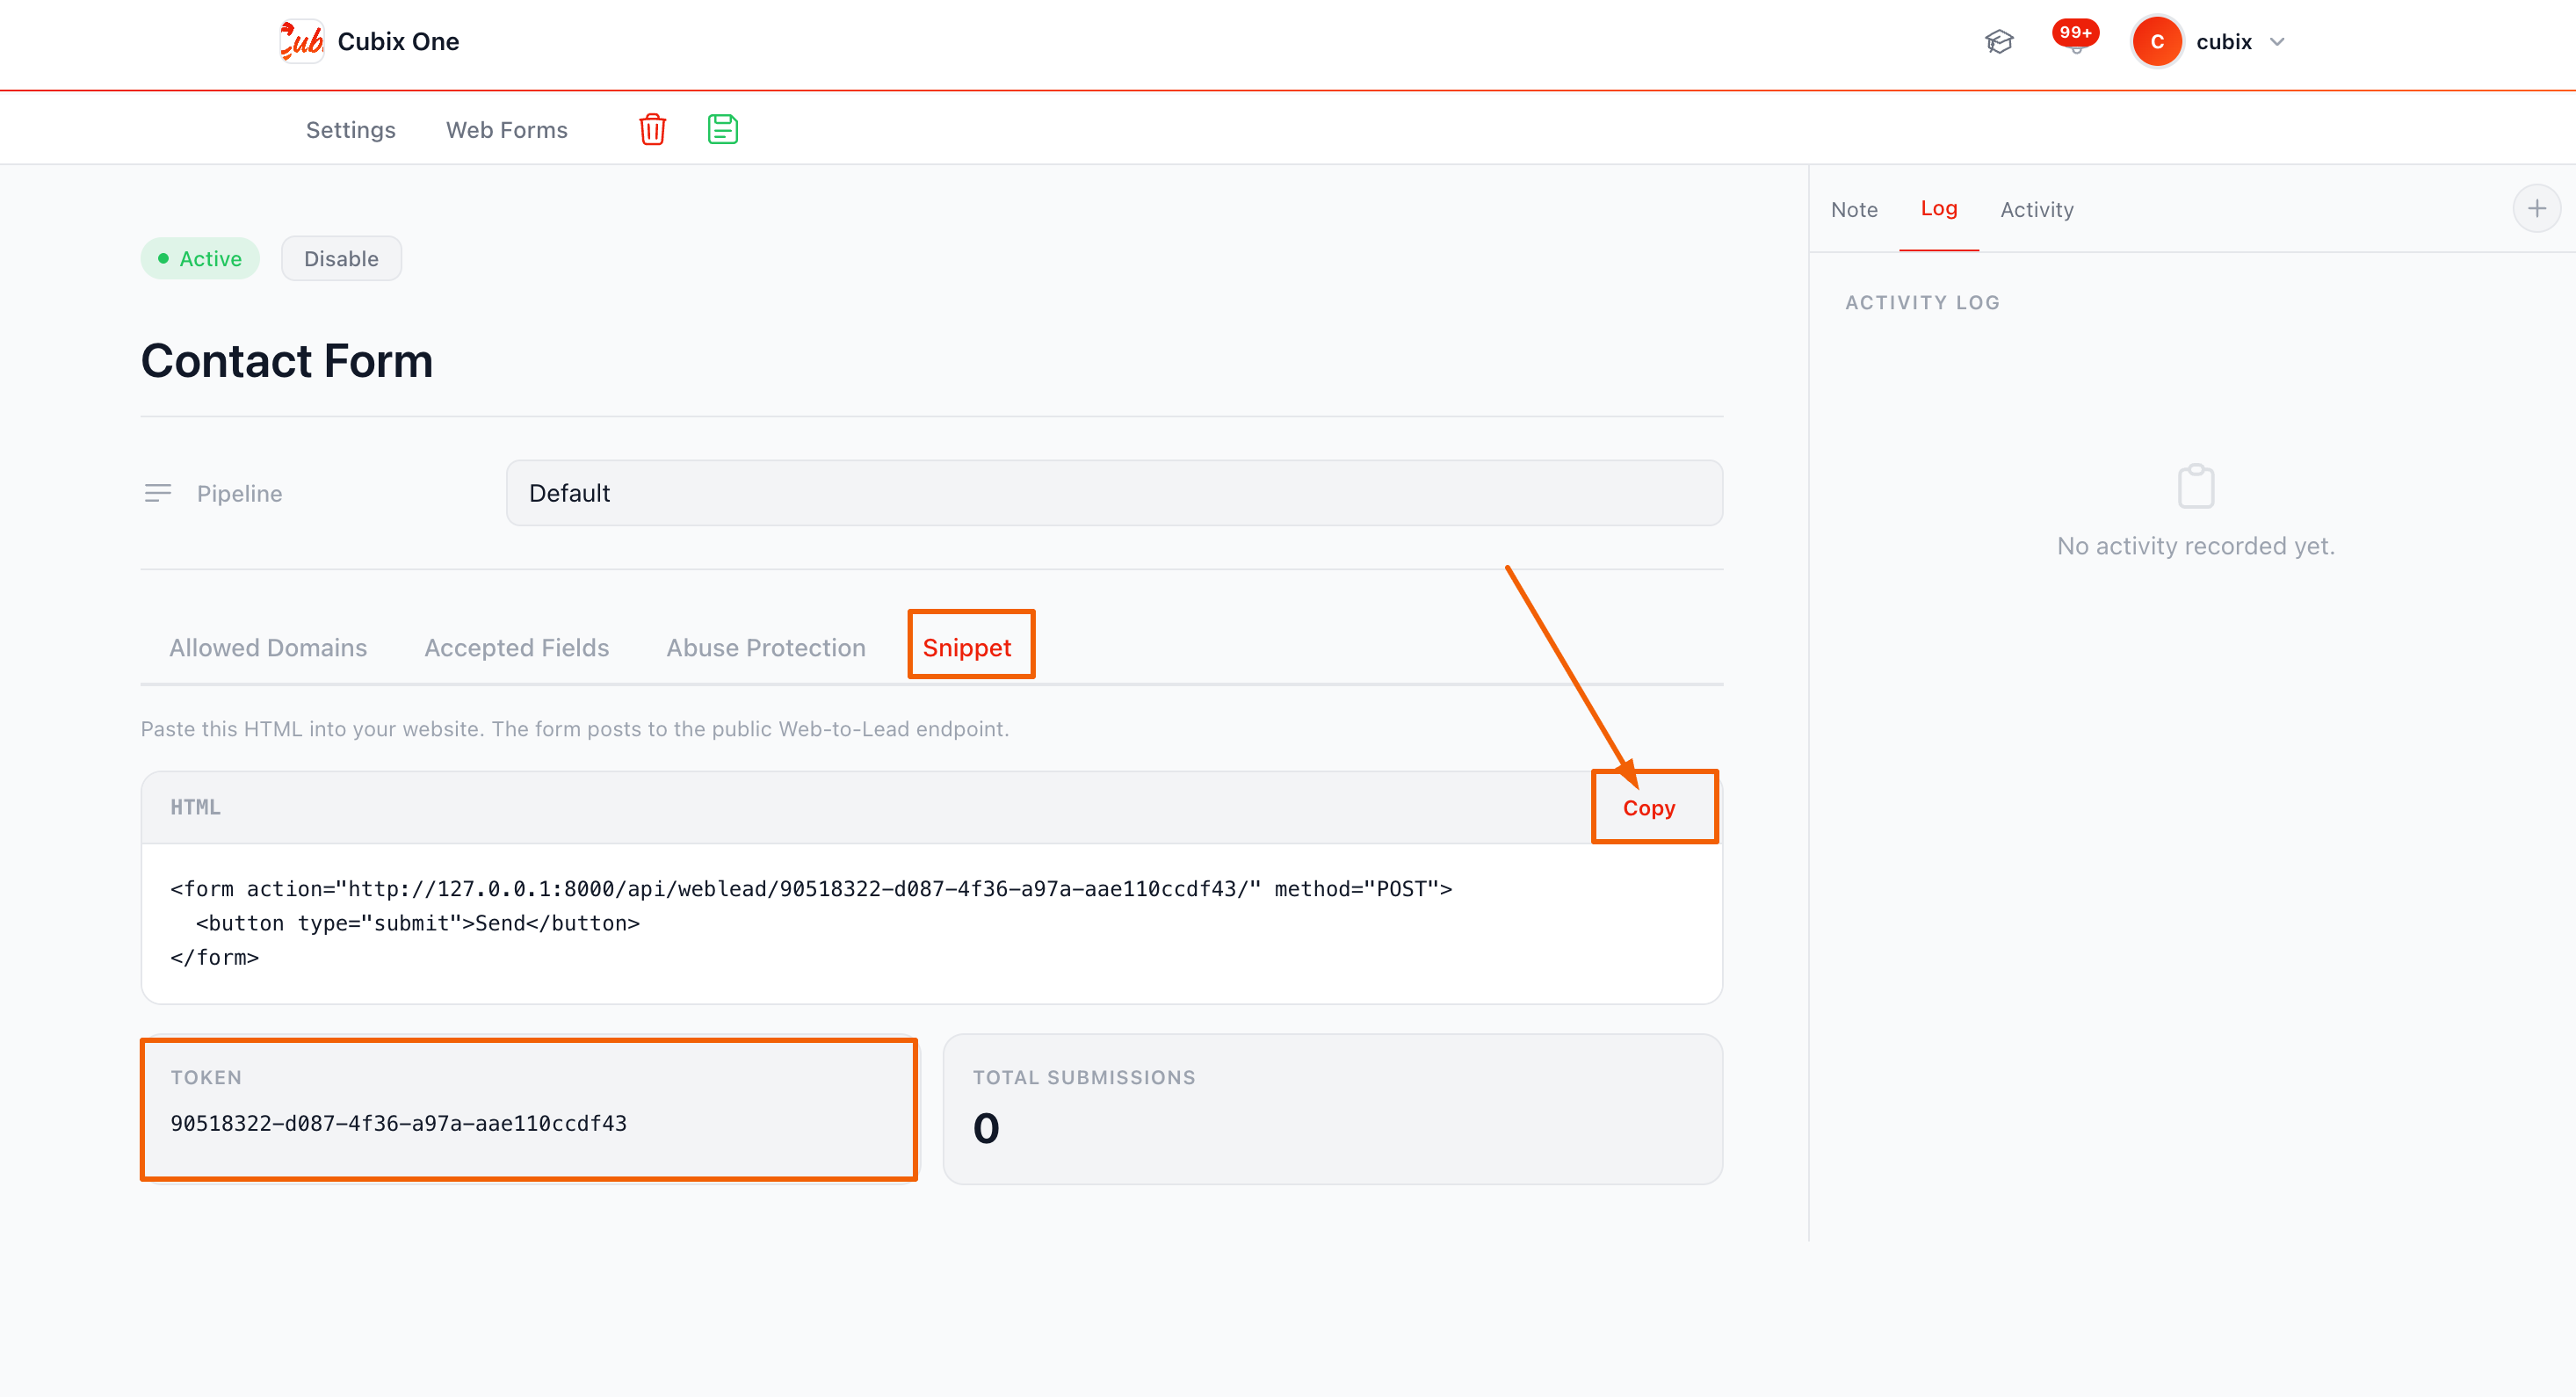
Copy the Token
After saving, click the webform row to open its detail. You will find a Token field — a UUID like 3f8a1b2c-4d5e-6f7a-8b9c-0d1e2f3a4b5c. Copy this token. It is what authorises your submissions.
Add the token to your website
Store the token in your website's environment variables or configuration. Never hardcode it in public JavaScript files. Use it in your fetch or form submission handler to build the endpoint URL:
JSconst FORM_TOKEN = process.env.CUBIX_WEBFORM_TOKEN;
const ENDPOINT = `https://app.cubixone.pt/api/weblead/${FORM_TOKEN}/`;
Webforms
A Webform is a configuration object inside CubixOne that defines which data a form can receive, where leads end up, which websites are allowed to submit, and how abuse is handled.
Webform properties
| Property | Type | Description |
|---|---|---|
| token | UUID | Auto-generated unique identifier. Used in the API endpoint URL. |
| name | string | Internal label. Not exposed to end users. |
| pipeline | FK → Pipeline | Leads created by this form will be placed in this pipeline. If not set, the company's default pipeline is used. |
| allowed_domains | list[string] | Allowed Origin domains (e.g. mysite.com). If empty, all origins are allowed. Checked against the HTTP Origin header. |
| accepted_fields | list[string] | Whitelist of fields this form will process. Any field not in this list is silently ignored. |
| custom_fields_config | list[object] | Definitions of custom fields accepted by this form. See Custom Fields. |
| abuse_mode | enum | alert_only — notifies admin but allows submission. alert_and_block — notifies and returns 429. |
| submission_count | integer | Total successful submissions. Read-only, displayed in the CRM UI. |
| last_submission_at | datetime | Timestamp of the most recent successful submission. |
| is_active | boolean | Inactive forms return 404 for all submissions. Toggle to disable a form without deleting it. |
Allowed Domains (CORS protection)
The allowed_domains list controls which websites can submit to this form. If you enter mycompany.com, only requests with Origin: https://mycompany.com (or http://mycompany.com) will be processed.
Enter one domain per line. Do not include protocol (https://) or paths. Examples:
mycompany.com
landing.mycompany.com
partner-portal.io
Accepted Fields
The accepted_fields list defines exactly which fields this form will process. Any field sent in the payload that is not in this list is silently dropped — it never reaches the database.
Built-in fields available:
| Field key | Lead destination |
|---|---|
| name | Lead name and contact name |
| Contact email | |
| phone | Appended to lead description |
| subject | Used as lead name when name is absent |
| message | Appended to lead description |
| company_name | Appended to lead description |
Abuse protection
CubixOne has two layers of automated abuse protection per webform:
| Layer | Threshold | Action |
|---|---|---|
| Rate limit | 10 submissions / 60 seconds / IP | Returns 429 Too Many Requests |
| Spike detection | 50 submissions / 5 minutes / IP | Alerts admin (and optionally blocks, based on abuse_mode) |
JSON Payload Reference
Complete reference for the request body sent to the Web Lead API endpoint. The API accepts both application/json and application/x-www-form-urlencoded.
Endpoint
Headers
| Header | Value | Required |
|---|---|---|
| Content-Type | application/json or application/x-www-form-urlencoded | Yes |
| Origin | Your website domain (set automatically by browsers) | Auto |
Built-in fields
All fields are optional strings. Values longer than 500 characters are truncated. Only fields listed in the webform's accepted_fields are processed.
| Field | Type | Max Length | Description |
|---|---|---|---|
| name | string | 500 | Full name of the lead or contact. Used as the lead title in the CRM. If absent, subject or email is used as fallback. |
| string | 500 | Email address. Stored in the lead's contact email field. Not validated server-side — validate on your frontend before submitting. | |
| phone | string | 500 | Phone number. Included in the lead description. Accepts any format. |
| subject | string | 500 | Subject or topic of the enquiry. Used as lead title when name is not provided. |
| message | string | 500 | Free-text message from the visitor. Stored in the lead description, HTML-sanitised. |
| company_name | string | 500 | Company or organisation the lead represents. Stored in the lead description. |
Custom fields
Custom fields are sent as regular top-level keys alongside built-in fields. The key must match the key defined in the webform's custom_fields_config. See Custom Fields for full details.
Full payload example
JSON{
  "name":         "Ana Ferreira",
  "email":        "ana@empresa.pt",
  "phone":        "+351 912 345 678",
  "company_name": "Empresa Lda",
  "subject":      "Interested in CRM plan",
  "message":      "Hello, I'd like to know more about pricing.",

  // Custom fields (defined per webform)
  "employees":    "10-50",
  "budget":       "5000",
  "source":       "google"
}
Response
All responses are JSON.
JSON — Success{ "ok": true }
JSON — Error{ "ok": false, "error": "Too many requests" }
What happens to the data
When a valid submission is received, CubixOne:
- Resolves the pipeline and its first active stage
- Creates a new Lead record in that stage
- Sets the lead name from name → subject → email (first non-empty)
- Builds the lead description with all submitted fields formatted as HTML
- Sets contact email from the email field
- Increments the webform's submission_count
- Returns {"ok": true}
Custom Fields
Custom Fields let you extend the standard form payload with any fields specific to your business — sector, number of employees, budget range, acquisition source, and more.
Configuring Custom Fields
Create the Custom Field in CRM Settings
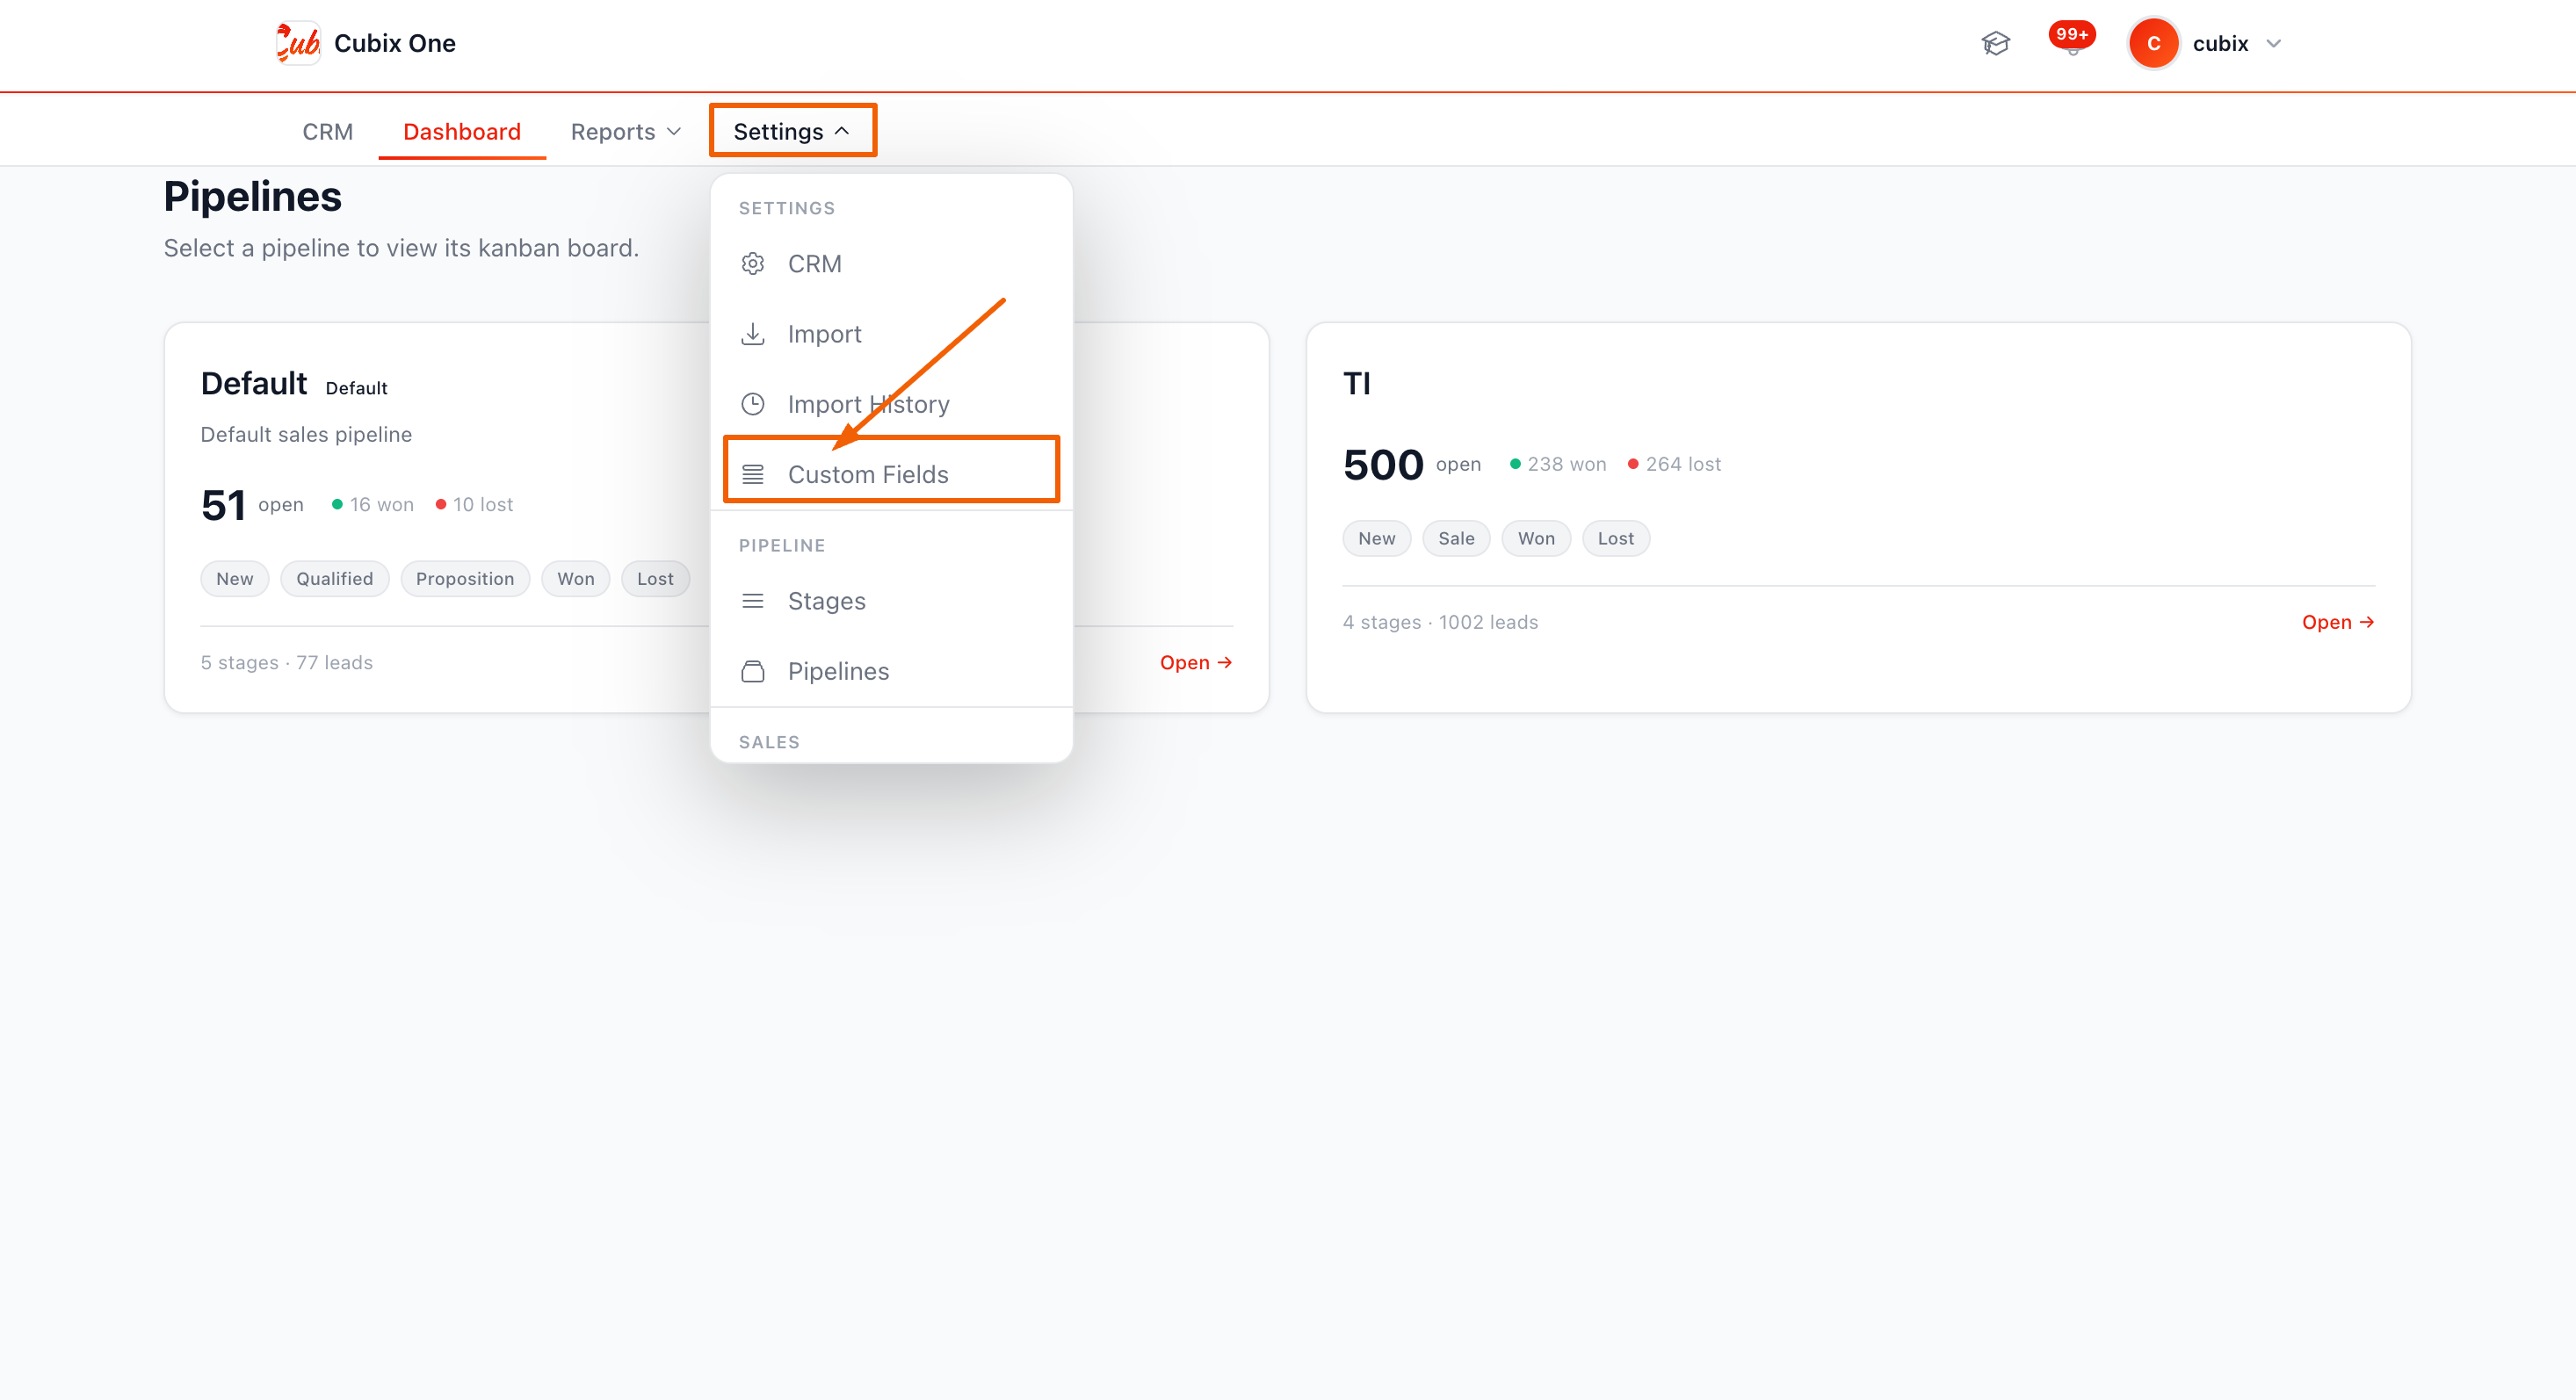
In the CubixOne dashboard, go to CRM → Settings → Custom Fields (from the Settings dropdown). Here you create the field definition — key, label, type, and whether it is required.
Fill in the field definition
Click + New Custom Field and fill in:
| Property | Description | Rules |
|---|---|---|
| key | The JSON key used in the API payload (e.g. employees) | Lowercase, alphanumeric + underscores. Cannot match a built-in field name. |
| label | Human-readable label shown in the CRM (e.g. "Number of employees") | Max 100 characters. |
| field_type | The expected data type | One of: text, email, tel, textarea, number, url, select |
| required | Mark as required (frontend validation hint only) | true / false. Server-side does not enforce this. |
Enable the field in the Webform
Once the custom field exists, open the Webform (CRM → Settings → Webforms) and go to the Accepted Fields tab. Enable the custom field key there so the webform will process it when submitted.
Sending custom fields in the payload
Custom fields are sent as regular top-level keys in the JSON body — no nesting, no special wrapper object:
JSON{
  "name":      "João Silva",
  "email":     "joao@empresa.pt",

  // Custom fields — keys must match exactly
  "employees": "10-50",       // field_type: select
  "budget":    "15000",       // field_type: number
  "sector":    "technology"   // field_type: text
}
custom_fields_config object reference
This is how the field definitions are stored internally. You can inspect them via the CRM Settings UI:
JSON// custom_fields_config array on the WebLeadForm
[
  {
    "key":        "employees",
    "label":      "Number of employees",
    "field_type": "select",
    "required":   false
  },
  {
    "key":        "budget",
    "label":      "Estimated budget (€)",
    "field_type": "number",
    "required":   false
  }
]
Custom Field types
| field_type | Expected value | Notes |
|---|---|---|
| text | Any string | General purpose text. Max 500 chars. |
| Email string | Validated by frontend. Server stores as-is. | |
| tel | Phone string | Any format accepted. |
| textarea | Multi-line string | Long text, max 500 chars after truncation. |
| number | Numeric string | Send as string (e.g. "5000"). Stored as string. |
| url | URL string | E.g. "https://mysite.com". |
| select | Option value string | Selected value from a dropdown. Send the value, not the label. |
Code Examples
Ready-to-use examples for the most common integration scenarios.
JavaScript — fetch (recommended)
JSasync function submitLead(formData) {
  const response = await fetch(
    'https://app.cubixone.pt/api/weblead/YOUR_TOKEN_HERE/',
    {
      method:  'POST',
      headers: { 'Content-Type': 'application/json' },
      body:    JSON.stringify({
        name:         formData.name,
        email:        formData.email,
        phone:        formData.phone,
        company_name: formData.company,
        message:      formData.message,
        employees:    formData.employees,  // custom field
      }),
    }
  );

  const result = await response.json();

  if (result.ok) {
    console.log('Lead submitted successfully');
  } else {
    console.error('Submission failed:', result.error);
  }
}
HTML form with vanilla JS
HTML + JS<form id="contact-form">
  <input name="name"    type="text"  required>
  <input name="email"   type="email" required>
  <input name="phone"   type="tel">
  <textarea name="message"></textarea>
  <button type="submit">Send</button>
</form>

<script>
document.getElementById('contact-form')
  .addEventListener('submit', async (e) => {
    e.preventDefault();
    const data = Object.fromEntries(new FormData(e.target));
    await fetch('https://app.cubixone.pt/api/weblead/YOUR_TOKEN/', {
      method:  'POST',
      headers: { 'Content-Type': 'application/json' },
      body:    JSON.stringify(data),
    });
  });
</script>
cURL
SHELLcurl -X POST \
  https://app.cubixone.pt/api/weblead/YOUR_TOKEN_HERE/ \
  -H 'Content-Type: application/json' \
  -d '{
    "name": "Test Lead",
    "email": "test@example.com",
    "phone": "+351 900 000 000",
    "message": "This is a test submission."
  }'
Python — requests
PYTHONimport requests

response = requests.post(
    "https://app.cubixone.pt/api/weblead/YOUR_TOKEN_HERE/",
    json={
        "name":         "Ana Costa",
        "email":        "ana@empresa.pt",
        "company_name": "Empresa Lda",
        "message":      "Interested in the Pro plan.",
        "employees":    "10-50",     # custom field
    }
)
data = response.json()
print(data)  # {"ok": true}
n8n / Zapier / Make
Use an HTTP Request node with:
| Setting | Value |
|---|---|
| Method | POST |
| URL | https://app.cubixone.pt/api/weblead/YOUR_TOKEN/ |
| Body type | JSON |
| Fields | Map your source fields to the CubixOne field keys |
Security & Limits
Everything you need to know to keep your webform secure and within operating limits.
Token security
The webform token is the only authentication mechanism. There are no API keys, OAuth flows, or signed requests. This keeps integration simple — but means you must protect the token:
| Rule | Reason |
|---|---|
| Never commit the token to a public repository | Anyone with the token can create leads in your CRM |
| Store it in environment variables | Prevents accidental exposure in build artefacts |
| Set Allowed Domains in production | Prevents other websites from sending fake leads |
| Disable unused forms immediately | Inactive forms return 404 and cost nothing |
| Rotate the token (delete + recreate) if compromised | There is no "regenerate token" — create a new form |
Rate limits
| Limit | Window | Scope | Response |
|---|---|---|---|
| 10 submissions | 60 seconds | Per IP, per form | 429 Too Many Requests |
| 50 submissions (spike) | 5 minutes | Per IP, per form | Alert sent to admin. Blocked if abuse_mode = alert_and_block. |
Input sanitisation
All submitted field values are processed as follows:
- Truncated to 500 characters per field
- HTML in the message field is sanitised with bleach before storage
- Unknown fields (not in accepted_fields) are silently dropped
- No SQL injection risk — CubixOne uses the Django ORM exclusively
CORS & Origin checking
If allowed_domains is set on the webform, every submission's Origin header is checked against that list. The domain is extracted by stripping https:// and http:// prefixes and any path component.
A request with Origin: https://mysite.com/landing is matched as mysite.com.
Recommended security checklist
- ✅ Set allowed_domains to your production domain
- ✅ Use abuse_mode: alert_and_block for public-facing forms
- ✅ Add a honeypot field to your HTML form to block bots
- ✅ Validate required fields on your frontend before submitting
- ✅ Store the token in an environment variable, not in JS source
- ✅ Disable forms that are no longer needed
- ✅ Monitor submission counts in CRM → Settings → Webforms